
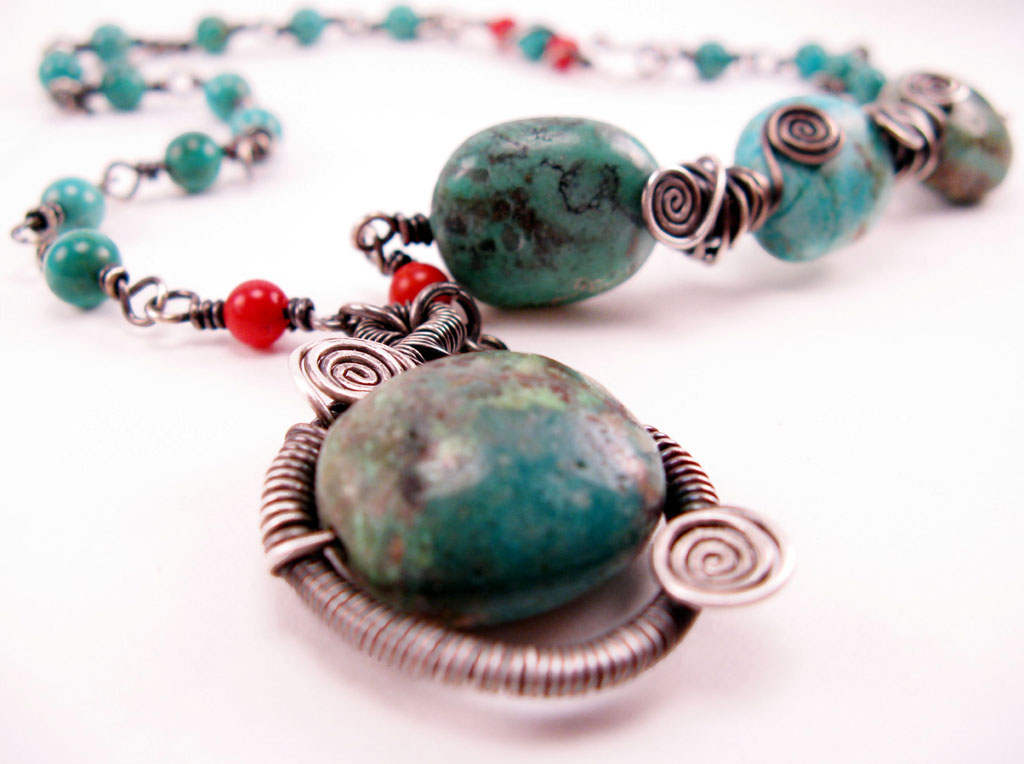
Sigh. Well, I wanted to work on something new tonight, given the latest group I joined on Flickr, which is titled "Design a Day" courtesy of gemmafactrix! But, I had violin lessons, and then when I got home I had a few other things to take care of, and then I wanted to list two more items...and, well, you know. So, tomorrow I'll start the challenge. First off, if I feel like weaving and coiling, I'd like to do a "redo" of the pendant in my Fire Gypsy necklace (yeah, that's what I decided to name it). I posted another version of this in one of my previous entries. Upon further inspection, I noticed that my coils aren't lining up correctly at the bottom (see what I mean...look at the top of the spiral...that little piece of wire sticks out where the coil should cover it), and they just look a little too sloppy for me. So, back to the drawing board! Bummer, because I'm going to lose about 8 feet of wire, but luckily it's a smaller gauge and doesn't impact me as much.
In other news, I'm still waiting on one final item--my saw blades--in order to do some of the metalsmithing projects I want to do. Ugh. It's been more than two weeks now, and I'm getting restless. Until then, maybe I'll just draw everything that I have in my head, that should keep me occupied for a few hours LOL.
1.31.2008
Fire Gypsy
1.30.2008
Add Your Etsy Mini to Blogger
This tutorial covers adding an Etsy Mini to your blog. For this example, I'll be showing you how to add the Mini to one of your sidebar columns (rather than directly in a blog post). Since the sidebar content remains static regardless of what blog post a user chooses to view, I figured this would be the most commonly used option.
Alrighty...here we go (by the way, if the pics are hard to view, you can always click on them for a larger version):
Step 1: From Your Etsy, click the Etsy Mini link, located at the bottom left of the screen (for this screen capture, I highlighted it for you so it would stick out better).
The Build Your Own Etsy Mini screen appears (note that my screen capture is cropped a bit at the bottom; no worries for this tutorial):
Step 2: In the Items to show area, select the Items from my shop radio button. Step 3: In the Choose image size area, select the size of the thumbnail you would like to display on your blog. For this tutorial, we'll go with the thumbnail size, so select the Thumbnail (75px square) radio button. Notice that when you select the radio button, your Etsy Mini displays a preview based on the default Choose layout selection, which is 1 column and 4 rows.
 Step 4: We're going to make our Etsy Mini 2 columns and 4 rows, just to change it up a bit. To change the layout, select 2 from the Columns dropdown list of the Choose layout area. Since the default is 4 in the Rows dropdown list, leave it as is. Notice that your Mini changes as soon as you make your selection!
 Step 5: Now take a look at the bottom of your screen. As you were building your Mini, the code for it was automatically generated in the Copy this code for the javascript version and the Copy this code for the Flash version areas. Blogger uses the javascript version, so you need to copy all of the code to your clipboard (shortcut: select all of the text and then press Ctrl+ C).
 Step 6: Now you're ready to add your code to Blogger. First, get to your dashboard, and then click the Layout link (I have it highlighted for you here again) for the blog you want to update (if you only have one blog, then it will be the only one displayed on your dashboard).
 Step 7: The Add and Arrange Page Elements screen appears. Yours will look a little different than mine, since you undoubtedly have a different layout, but the common elements remain the same (blog title, sidebar, and blog posts).
 You're now ready to add a new page element, so click the Add a Page Element link, which will be located above the area where you have your sidebar (usually the left side or the right side; however, I've seen blogs with sidebars on each side, so pick which one you want to place your Etsy Mini in).
Step 8: The Choose a New Page Element pop-up window appears. You want to add HTML/Javascript to your page, so click the ADD TO BLOG link that appears below the HTML/Javascript element.
Step 9: The Configure HTML/Javascript Element pop-up window appears. You're now ready to populate this window with a title for your Etsy Mini and your code:
- Type a title in the Title field (I used "Visit My Etsy Shop! in this example, but you can use anything you want, or you can even leave it blank).
- Paste your code into the Content field (shortcut: press Ctrl + V). Note that my code will be a little different than yours--that seven-digit number is my own, personal Shop ID. Your code will display your shop ID.
- Click SAVE CHANGES.

Step 10: The pop-up window will close, and the Add and Arrange Page Elements screen will appear once again.
 See that yellow area at the top that says "Page Element Added. View Blog"? That's to let you know that Blogger accepted the change, and you can see what it looks like immediately.
Click View Blog to see your Etsy Mini.

And how 'bout that? There it is, right at the top left, just where we told it to be.
I hope you have a most excellent time messing around with this fun little Etsy feature. Once you get used to how it can function, and the different variations available, you'll have your Mini pasted all over the place.
Enjoy!
1.29.2008
Inspiration
When I first joined Flickr, I remember finding the Wire Sculpture group and how excited I was...it was like a catalog full of the type of jewelry I love to make! It was a great source of inspiration to me, and it helped me start building up inventory for my Etsy shop (it was Flickr, after all, that introduced me to Etsy!).
I'm currently an administrator for the group, which doesn't require much, but it does keep me busy by making sure I welcome new members when they post to discussion boards and leaving comments on photos. Lately, however, I've been seeing many posts on Etsy related to Flickr, and how a number of sellers have been able to score sales through their groups. So, today, I decided to join some new ones.
I'm not going to list them all here, but I did want to mention my favorite of the day: Silversmithing & Metalsmiths ~Forging & Fabricating. It's a group that's all things metal, and of course intrigues me given my latest endeavor. Looking through the photos, I'm amazed at the amount of talent out there...and such unique designs. I keep thinking about what my newly composed pieces will look like, and there are a number of things that keep creeping into my head:
- Hand forged chains friggin' ROCK. 'Nuff said.
- The more hammered, the better.
- Blackened metal is my favorite metal.
- I don't think I'll ever be able to do away with beads, so many of my metal pieces will probably incorporate color through my favorite gemstones (which are too many to name!).
- Clasps and their design are very, very important.
- Fat rings with bezel set stones are a necessity.
- Mixtures of metal add depth and make for a spectacular focal piece.
- Everyone should have a metal cuff in their wardrobe.
- Heated metal is HAWT!
What types of things inspire you? Where do you get your ideas for your creations?
1.23.2008
Well, Great.
Grrrrr so I thought I was in the Etsy Showcase TOMORROW, and it turns out it was TODAY. The only way I figured it out is because a special someone sent me a nice little comment about my stuff, saying she saw it there. To top it off, Etsy changed the way you rank your items for showcases, so the items that were appearing for my shop since midnight last night weren't even the ones I wanted featured! Double grrrrrr.
So, that being said, I was going to list some new items tonight, but now I'll wait. Actually it works out for the best, anyway, because I don't think I'd have gotten them all posted. Here's a few little surprises for ya (unedited as of yet, so bear with me):
A moukaite focal pendant wrapped with a herringbone weave and hung from a hand forged sterling silver chain and clasp. You can't see it on this pic, but an amber bead is also added as an accent to the clasp. Official name TBD.
 Red Agate Pendant
 Cool as Ice Earrings
Peacock pearls and rainbow moonstone delicately dangle from handcrafted inverted V ear wires. I love these!
 Red Bliss Earrings
Dyed red coral beads are nestled between sterling silver beads and suspended from inverted V ear wires. I love these, too!
 The above items, along with a few others, will be posted in my shop over the next couple of days. More and more pieces are coming; I hope to keep filling up my storefront and then I'll take a break for a while so I can fire up that torch and move on to that next endeavor of mine.
1.20.2008
...And Metalsmithing Begins
Well, sorta.
All equipment is here, for the most part. All tools are here, for the most part. All materials are here. For real. I'm missing a few key items, one of which is on backorder, so until it gets here I may be a little bit delayed. But, I can't wait!
I'm most excited about creating fused chain links and being able to make rings. I'm not really a fan of wire rings, that's why you don't see them in my shop very often, so hopefully you'll be able to see the real deal very soon! Lately I've been a fan of the tension-set type...I'm hoping I'll be able to pick up the technique sooner than later.
My husband is in the process of carving me out a little work area in our basement; I'm not real sure yet that he wants to share his sacred space, but I remind him that this hobby of mine could possibly make us rich one day (hahahahaha LOL) and he then becomes somewhat more accommodating.
I also worked on some pendants this weekend, including a standalone pendant similar to that found in my Back to Earth necklace, only it incorporates red coral and sterling silver beads into the design. In addition, I made some copper and agate pendants based on the Back to Earth pendant, which will be attached to leather cord. Finally, I worked on a herringbone weave focal pendant, which will be hung from a handcrafted chain made from easy links. Yeehaw. New earrings are also on the way; I had some beads available that easily turned into simple, dangly designs.
I'll post progress of my new metalsmithing endeavor as I creep along; watch out for new items in my Etsy shop all this week.
1.13.2008
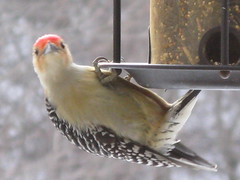
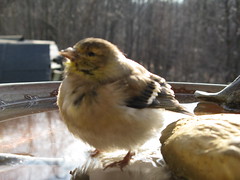
In the Backyard
Here's a quick and fun post, readers, brought to you by my backyard and the visitors that come there often.
Remember that red-bellied woodpecker I mentioned in a previous post? Well, I finally caught him in action! Check him out--he's saying hello! You can catch another view of him on my Flickr page.
And check out this one. He's a little portly goldfinch. He hangs out at my feeders all day and soaks in my birdbath, too! He let me get really close for the shot, so I'm hoping that he's not having a health issue. When I got even closer, he flew away to the tree where many of the goldfinches hang out, so hopefully he'll be fine.
Anyway, I'm off to enjoy my Sunday evening. I'll be listing things in my Etsy shop all night, so check back often! Also--a note--I'm traveling for work on Monday 1/14 through Wednesday 1/16, so I won't be in the studio until I return. All orders will be filled and/or custom made upon my return.
1.10.2008
Some Notes on What's Comin'
Many things, readers. Many, many things.
I put together a "Beneath the Moon" necklace last weekend, but it's comprised of garnets and pearls rather than smoky quartz and moonstone. I'm hoping it will be a Valentine's Day favorite, given its lovely red colors. Other Beneath the Moon items will include amazonite, serpentine (maybe), and some other beautiful colors of quartz.
I have some earrings coming, which are quite simple in design yet lovely nonetheless. One pair is comprised of smoky quartz briolettes (small ones), and the other pair is labradorite teardrops (the colors in them are amazing!). Another pair will feature red coral beads, another Valentine favorite.
An additional "Paint It" is in the works, which will be titled "Paint It Pomegranate." The name is inspired by my friend's feedback on her "Paint It Cherry Red" brooch, where, upon receipt, she e-mailed me with the phrase "I'm thinkin' pomegranates!" I'm hoping to incorporate all beautiful shades of red, purples, and pinks (thanks Deb!).
Labradorite faceted teardrops are on their way to my home, which means that I can list the items that are included in the Jonelle series, with some slight variations.
Finally, I completed the acquisition of all tools and materials required to start doing some metalsmithing. I hope to create my first project next weekend, after I get back from my trip for work. I also plan to enroll in a class during the March-April timeframe.
So...keep your eyes and ears open, dear readers. I promise to keep you informed.
One final note: I need to close the shop from 1/14-1/16, as I'll be traveling for work. Access to Etsy and e-mail will be minimal (if at all) during this time frame; all orders will be filled/created upon my return.
1.07.2008
My Gift to Me
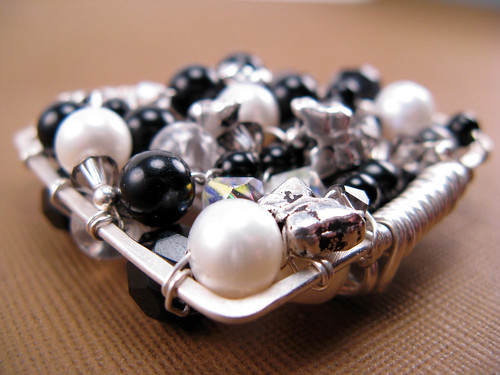
Well, I had a pretty large balance left over in my PayPal account after the holiday rush. I was tired of buying supplies and equipment, so I decided to buy another piece of gorgeous jewelry from Mary Boden of Wood Thrush Studio. You may recall when I first started this blog that I bought a dragonfly pendant from her back in September.
Here it is, in all of its exotic glory (the title of the piece, BTW, is called "Exotic Visitor;" read the details here): And here's another pic for you--you see that ring in there--yeah, I got myself that, too!
 In case you've never heard of Mary or her web site, she's well worth a visit. She has links to her Etsy shop on her web site as well, and you can also visit her blog at http://egg-shell.livejournal.com/. I absolutely adore her designs; she is everything I want to be as a metalsmith (and since I haven't started that aspect of this hobby of mine, I have a long way to go!).
So, here's to you, Mary. Thanks for making such beautiful things that keep me coming back to your shop...and thanks even more for being such an inspiration.
1.03.2008
New Stuff in the Store, Finally
Wow it's really been a long time...but I was finally able to finish and list a new item today. Ladies and gentlemen, introducing Paint It Black, my newest brooch of the "Paint It" series. This one is nice and thick, with many layers of weaves using the mosaic technique. I like the versatility of it, as black, white, and silver have such a wide range of possibilities when matched with other colors.
My problem with the Paint It brooches, however, is that they barely get any views when they appear in the listings alone. It seems they do much better when they're picked up in a treasury or when they have a showcase spot. We'll see how this one goes; it might take some extra effort to promote.
Also, I finally have my Jonelle set ready for posting on my blog! Here's a photo of the set, which includes a lariat necklace, bracelet, and earrings. I'm going to be offering these pieces in my shop on a made to order basis, but I first need to buy more labradorite; I ran out over the holidays!
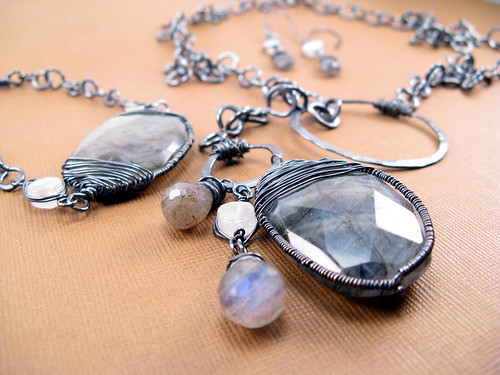
This set started with the necklace, and was inspired by my Beneath the Moon design, shown in the ring ends of the lariat. I also wanted to incorporate the herringbone weave, as it is one of my favorite techniques, so I merged the two components together into the final piece. I then created the chain links all by hand, soaked the necklace in a liver of sulfur solution to oxidize it, and finally tumbled it to a nice dark shine. The bracelet and earring design came easily; I followed the basic design of the necklace as well as some of my previous earring patterns.
Dependent upon how soon I can find/receive more labradorite teardrop beads, I hope to list these items by the end of the month.
That's all for now folks; I hope new pieces will be coming soon...I'm thinkin' pendants and I'm thinkin' copper. Yum.
1.01.2008
Happy New Year
Well well readers, it looks like 2008 is fully upon us. Are you ready for it? New year, new starts, new goals. I have yet to get mine in order for my Etsy shop (yes--the shop only--and goals only--I don't do resolutions!). Right now I'm sitting here waiting for some jewelry making materials to arrive, so my hands are staying busy by typing rather than wire wrapping.
It's snowing and cold in my little corner of the earth, and luckily I've been able to spend my day getting some things on the home front in order rather than being hungover! Haha. This year my husband and I kicked back and relaxed instead of going out for the festivities; the result was a fairly productive day. I took down my decorations, including my tree. I also got a fair amount of birdwatching done. We bought some books over the weekend, one of my favorites being The Backyard Bird Feeder's Bible, a lovely little find that has an A-Z guide for backyard feeding. Did you know those birds can eat just about anything? It's amazing what you can give them; not to mention, it helps to cut down on the amount of food that you put in the trash. The book includes tips on feeding, preparing for seasonal changes, recipes (all with readily available ingredients!), and is written so wonderfully that I went through it from cover to cover the night we got it! Today was also a special day, as a Red-Bellied Woodpecker came to visit. I've never seen one before. I wasn't fast enough to get a photo, but here's one from Wikipedia.
Tomorrow is the scheduled arrival of my materials (that is, if FedEx Home Delivery decides to bring my package when they're supposed to--we won't even go there). Hopefully I'll be getting started on some more Beneath the Moon pieces, and some new brooches, too. I'm going to create the brooches similar to my Paint It Cherry Red brooch (posted previously), but with different color schemes, as well as create a "Paint It Cherry Red II" (since none of them can really be the same due to the mosaic technique used). I'm planning to stock up on the brooches, mostly because after Cherry Red got placed in a treasury, it was snagged up pretty quick. My plan is to push those and the Moon series for my advertising, which will hopefully attract folks to my shop for the browsing/purchasing of other items. We shall see.
Anyway, I'm going to step away from this computer for now and enjoy the rest of my day off. Tomorrow I'll be in '08 mode, ready for the new year, its upcoming seasons, and all of the surprises it will hold. I really, really hope it's a good one for me, folks. And I truly hope the same for you. Cheers!


