This tutorial covers adding an Etsy Mini to your blog. For this example, I'll be showing you how to add the Mini to one of your sidebar columns (rather than directly in a blog post). Since the sidebar content remains static regardless of what blog post a user chooses to view, I figured this would be the most commonly used option.
Alrighty...here we go (by the way, if the pics are hard to view, you can always click on them for a larger version):
Step 1: From Your Etsy, click the Etsy Mini link, located at the bottom left of the screen (for this screen capture, I highlighted it for you so it would stick out better).
The Build Your Own Etsy Mini screen appears (note that my screen capture is cropped a bit at the bottom; no worries for this tutorial):
Step 2: In the Items to show area, select the Items from my shop radio button. Step 3: In the Choose image size area, select the size of the thumbnail you would like to display on your blog. For this tutorial, we'll go with the thumbnail size, so select the Thumbnail (75px square) radio button. Notice that when you select the radio button, your Etsy Mini displays a preview based on the default Choose layout selection, which is 1 column and 4 rows.
 Step 4: We're going to make our Etsy Mini 2 columns and 4 rows, just to change it up a bit. To change the layout, select 2 from the Columns dropdown list of the Choose layout area. Since the default is 4 in the Rows dropdown list, leave it as is. Notice that your Mini changes as soon as you make your selection!
 Step 5: Now take a look at the bottom of your screen. As you were building your Mini, the code for it was automatically generated in the Copy this code for the javascript version and the Copy this code for the Flash version areas. Blogger uses the javascript version, so you need to copy all of the code to your clipboard (shortcut: select all of the text and then press Ctrl+ C).
 Step 6: Now you're ready to add your code to Blogger. First, get to your dashboard, and then click the Layout link (I have it highlighted for you here again) for the blog you want to update (if you only have one blog, then it will be the only one displayed on your dashboard).
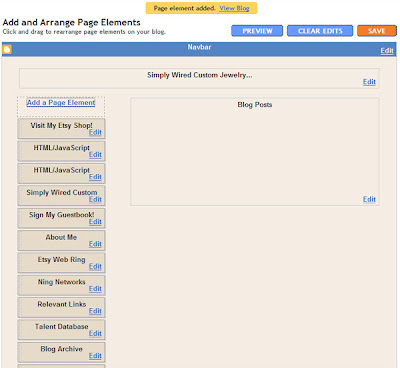
 Step 7: The Add and Arrange Page Elements screen appears. Yours will look a little different than mine, since you undoubtedly have a different layout, but the common elements remain the same (blog title, sidebar, and blog posts).
 You're now ready to add a new page element, so click the Add a Page Element link, which will be located above the area where you have your sidebar (usually the left side or the right side; however, I've seen blogs with sidebars on each side, so pick which one you want to place your Etsy Mini in).
Step 8: The Choose a New Page Element pop-up window appears. You want to add HTML/Javascript to your page, so click the ADD TO BLOG link that appears below the HTML/Javascript element.
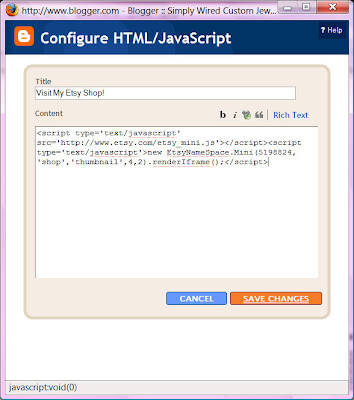
Step 9: The Configure HTML/Javascript Element pop-up window appears. You're now ready to populate this window with a title for your Etsy Mini and your code:
- Type a title in the Title field (I used "Visit My Etsy Shop! in this example, but you can use anything you want, or you can even leave it blank).
- Paste your code into the Content field (shortcut: press Ctrl + V). Note that my code will be a little different than yours--that seven-digit number is my own, personal Shop ID. Your code will display your shop ID.
- Click SAVE CHANGES.

Step 10: The pop-up window will close, and the Add and Arrange Page Elements screen will appear once again.
 See that yellow area at the top that says "Page Element Added. View Blog"? That's to let you know that Blogger accepted the change, and you can see what it looks like immediately.
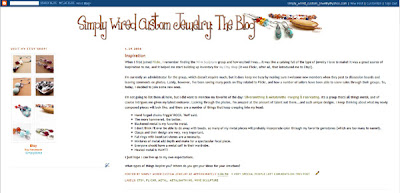
Click View Blog to see your Etsy Mini.

And how 'bout that? There it is, right at the top left, just where we told it to be.
I hope you have a most excellent time messing around with this fun little Etsy feature. Once you get used to how it can function, and the different variations available, you'll have your Mini pasted all over the place.
Enjoy!


